SCANMATE i940 型扫描仪 FAQs
Below are the frequently asked questions for the SCANMATE i940 型扫描仪.
Select another product by typing the name in the field below.
Using
-
如何使用智能触控?
有关使用此软件的信息,请参阅 Smart Touch 用户指南。
-
How can I obtain professional services and support for the scanner?
For information on how to contact Alaris support, please visit Alaris Services and Support.
-
如何查看 SVT/驱动程序 版本:
- 打开“控制面板”>“添加和删除程序”(XP) 或“程序和功能”(Vista 和 Win 7)。
- 向下滚动至柯达 [扫描仪型号] 扫描仪
- Vista 和 Win 7 – 版本位于最右端的列中。 记下版本。
- XP - 单击“单击此处可获得支持信息”链接。 记下版本。

-
如果进行扫描测试?
- 有关可用选项的信息,请参阅《用户指南》的第 3 节
Troubleshooting
-
What do I do if my scanner is running slowly?
- Your host PC may not meet the minimum requirements for the scanner. See Appendix A, Specifications, in the User’s Guide.
- Some image processing functions can reduce scanner speed.
- Your resolution (dpi) for image output may be too high.
- Your compression setting may be too low.
- Your anti-virus software may be scanning all TIFF or JPEG files.
- Check that you are scanning to a local drive.
-
连接性: 如果计算机无法识别扫描仪该怎么做?
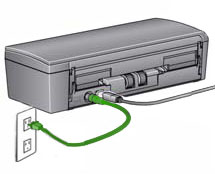
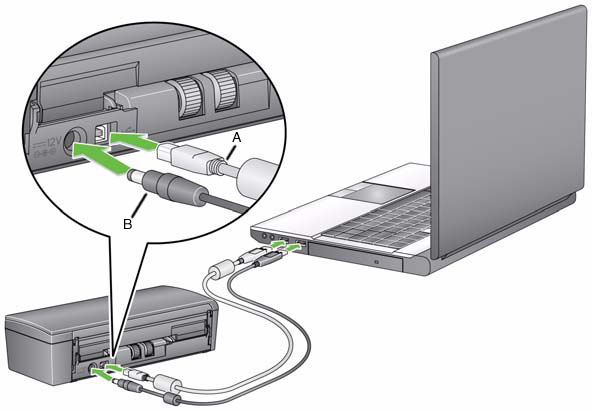
验证 USB 电缆已插入计算机和 SCANMATE i940 型扫描仪的 USB 端口。

检查连接:
- 将电源线连接至扫描仪,并验证其是否已完全插入扫描仪背面的电源连接器。
- 将电源线插头插入工作正常的电源插座。
注意: 如果使用墙壁插座或电源板,请验证它们都已开启。
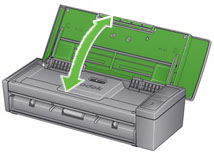
- 打开顶盖。
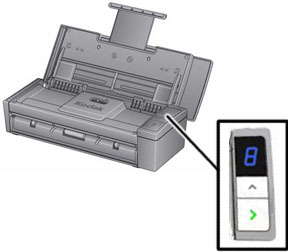
绿色的大于号 LED (>) 指示灯是否持续发光?
如果否
验证电源插座是否正常工作。
- 将扫描仪电源线从插座中拔出。
- 将其他装置的插头插入电源插座。
Maintaining
-
影像质量:如何提高影像质量?
按照以下所述步骤清洁扫描仪:
小心:- 请勿使用气体、液体或汽油喷雾清洁剂或其他家用清洁剂。
- 请勿在热烫表面上使用清洁剂。
- 在使用前先允许表面冷却至周遭温度。
- 具备足够的通风设施。 请勿在狭窄的地区使用清洁剂。
- 清洁任何内部零部件之前,拔下扫描仪上的电源线。
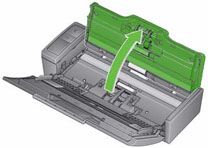
- 打开顶盖。
- 打开扫描仪护盖。
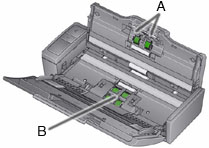
- 擦拭三个进纸滚筒 - A,使用滚筒清洁垫来回擦拭。 转动进纸滚筒以清洁整个表面。
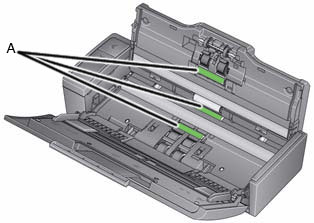
- 擦拭分纸滚筒 - B,使用滚筒清洁垫来回擦拭。 转动进纸轮以清洁整个表面。
- 使用进纸模块滚轮 - C,使用清洁垫来回擦拭。 转动进纸滚筒以清洁整个表面。
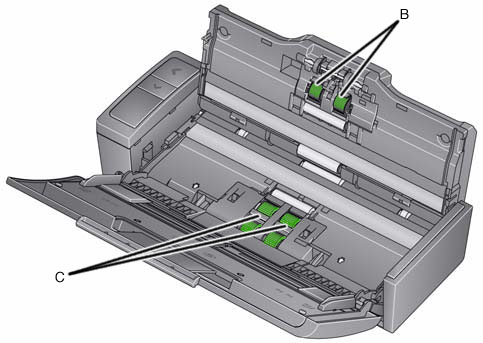
注意: 有关清洁扫描仪的详细信息,请参阅产品附带的用户指南。 - 将电源线连接到扫描仪。
- 合上扫描仪护盖。
- 扫描文档。
- How do I obtain consumables?
-
如何更换 SCANMATE i940 扫描仪的进纸模块?
卸下进纸模块:
- 打开顶盖。
- 打开扫描仪护盖。
- 断开扫描仪的电源。
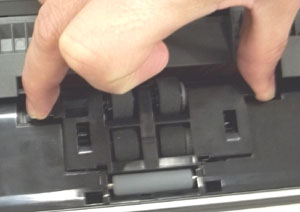
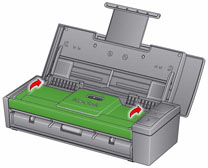
- 卸下进纸模块护盖:
- 将进纸模块两侧的拉头向内挤压。
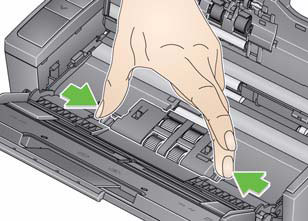
- 抬高并卸下进纸模块护盖。
- 将进纸模块两侧的拉头向内挤压。
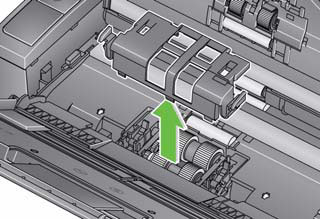
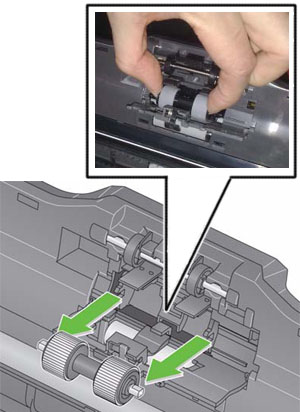
- 卸下进纸模块:
- 从底部向上推,并旋转进纸模块。

- 抬起一端,然后卸下进纸模块。
- 从底部向上推,并旋转进纸模块。
安装进纸模块:
- 将进纸模块轴的一端插入机架的插槽中。
- 插入另一端并推动进纸模块加以固定。
- 将进纸模块护盖与机架开口处对齐。
- 按下进纸模块护盖加以固定。
- 合上扫描仪护盖。
- 将电源线连接到扫描仪。
-
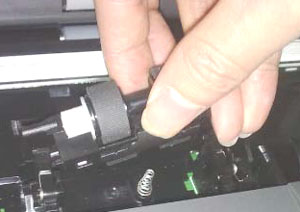
如何更换 SCANMATE i940 扫描仪的分纸滚筒?
卸下分纸滚筒:
- 断开扫描仪的电源。
- 打开顶盖。
- 打开扫描仪护盖。
- 用指甲撬开分纸滚筒护盖。

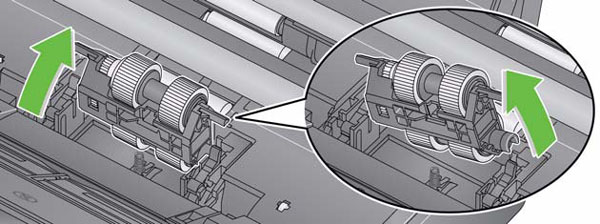
- 卸下分纸滚筒:
- 用大拇指和食指抓住分纸滚筒外侧边缘。
- 拉动分纸滚筒将其取出。
安装分纸滚筒:
- 插入分纸滚筒时,轴的平端应与机架中的插槽对齐。
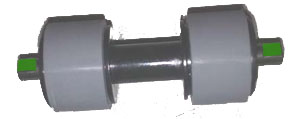
- 将分纸滚筒向下按压以固定。
- 关闭分纸滚筒护盖。
- 合上扫描仪护盖。
- 将电源线连接到扫描仪。
-
How do I resolve an error code E4 (Scanner error)?
Restart the scanner:
- Close the top cover.
- Open the top cover.
- Restart the scanning application and resume scanning.
-
How do I resolve an error code U6 (Scanner cover open error)?
Close the scanner cover.
-
How do I resolve an error code U8 ( Multifeed error)?
- Open the scanner cover.
- Remove the multifed documents.
- Change the driver window to the type of paper you are using.
- Check that the following are clean and not worn:
- Separation rollers - A
- Feed rollers - B
- Close the scanner cover.
IMPORTANT: Verify that the documents you are scanning meet the following specifications:- Acceptable Paper Weight: 4.9 to 14.5 g/m2 (10.7 to 32 lbs.)
- Maximum document size: 21.6 x 165.1 cm (8.5 x 65 in.)
- Minimum document size: 8.0 x 5.2 cm (3.15 x 2.05 in.)
- Maximum number of documents in the input tray is 20
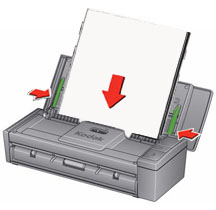
- Align and load the documents again. Do not load more then 20 documents in the input tray.
- Move the guides until they just touch the edge of the document.
- Restart the scanning application and resume scanning.
- Open the scanner cover.
-
How do I resolve an error code U9 (Paper jam or unexpected error)?
IMPORTANT: The U9 error occurs when there is a paper jam in the scanner. This error can also occur when something unexpected happens like the loss of power during scanning. With some older computer operating systems when you use the scanner without the power supply, a power starvation situation can occur.
Did a blank sheet exit the scanner while you were scanning?
----------------------------------------------------IF YES--------------------------------------------------
- Open the scanner cover.
- Remove the documents that are being scanned.
- Close the scanner cover.
- Check the USB connections between the scanner and your computer. If you are
only using one USB cable (B), connect the other USB cable (A) between your
scanner and computer.
- Align the documents and load them into the input again.
- Move the guides until they just touch the edge of the document.
- Restart the scanning application and try to scan again.
----------------------------------------------------IF NO ---------------------------------------------------
- Open the scanner cover.
- Remove the documents that are being scanned.
- Clear the paper jam:
- Inspect the inside of the scanner for bits of paper or other foreign objects.
- If necessary, clean:
- Separation rollers - A
- Feed module - B
- Inspect the inside of the scanner and clean it if necessary.
- Close the scanner cover.
IMPORTANT: Verify that the documents you are scanning meet the following specifications:- Acceptable Paper Weight: 4.9 to 14.5 g/m2 (10.7 to 32 lbs.)
- Maximum document size: 21.6 x 165.1 cm (8.5 x 65 in.)
- Minimum document size: 8.0 x 5.2 cm (3.15 x 2.05 in.)
- Align the documents and load them into the input again.
- Move the guides until they just touch the edge of the document.
- Restart the scanning application and resume scanning.
- 如何更新驱动程序?
-
哪些耗材和消耗品适用于 Kodak Alaris 扫描仪?
- 有关适用于 Kodak Alaris 扫描仪的耗材和消耗品的完整列表,请查阅耗材和消耗品指南。
-
What do I do if my scans have clipped corners?
IMPORTANT: If a sheet is not fed evenly from the input tray, the scan may skew and the corners of the image may get clipped off during the scanning process.
Do the following for best results when loading documents into the scanner:
- Verify that all inks and correction fluids are dry.
- Remove any staples or paper clips.
- Align the leading edges of the sheets.
- Load the sheets so they are centered in the input tray with the side to be scanned facing away from you.
- Move the side guides until they just touch the edges of the sheets.
- Scan your document(s).
-
错误: 如果出现 Framework 错误,该怎么办? “未检测到 .NET Framework 版本 2.0 或更高版本。 某些同步功能可能无法正常工作。”
问题
将 PRESTO! BIZCARD 软件安装到运行 WINDOWS 8 的系统之后,安装期间或安装完成之后首次启动软件时出现以下消息:
“未检测到 .NET Framework 版本 2.0 或更高版本。 某些同步功能可能无法正常工作。”
分辨率
- 选择控制面板 > 程序和功能
- 打开 WINDOWS 功能: .NET Framework 3.5
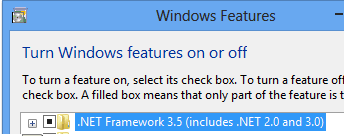
- 重新安装 PRESTO! BIZCARD 软件。
- 选择控制面板 > 程序和功能