SCANMATE i940 스캐너 FAQs
Below are the frequently asked questions for the SCANMATE i940 스캐너.
Select another product by typing the name in the field below.
Installing
-
스캐너를 설치하고 싶습니다.
스캐너 설치 방법에 대한 자세한 사항은 사용자 안내서의 2장을 참조하십시오.
Using
-
Smart Touch는 어떻게 사용합니까?
이 소프트웨어 사용에 대한 정보는 스마트 터치 사용 설명서를 참조하십시오.
-
How can I obtain professional services and support for the scanner?
For information on how to contact Alaris support, please visit Alaris Services and Support.
-
SVT/드라이버</span> 버전은 어떻게 확인합니까?
- 제어판 > 프로그램 추가 및 제거(XP) 또는 프로그램 및 기능(Vista &7)을 실행합니다.
- Kodak [스캐너 모델] 스캐너를 찾습니다.
- Vista and 7 – 오른쪽 끝 열에 표시된 버전을 확인합니다.
- XP - '지원 정보를 보려면 여기를 클릭' 링크를 클릭합니다. 버전을 확인합니다.

-
테스트 스캔은 어떻게 실행합니까?
- 사용자 가이드의 3장에서 사용 가능한 옵션을 확인할 수 있습니다.
Troubleshooting
-
What do I do if my scanner is running slowly?
- Your host PC may not meet the minimum requirements for the scanner. See Appendix A, Specifications, in the User’s Guide.
- Some image processing functions can reduce scanner speed.
- Your resolution (dpi) for image output may be too high.
- Your compression setting may be too low.
- Your anti-virus software may be scanning all TIFF or JPEG files.
- Check that you are scanning to a local drive.
-
연결성: 컴퓨터가 스캐너를 인식하지 못하는 경우에는 어떻게 해야 합니까?
USB 케이블이 컴퓨터와 SCANMATE i940 스캐너의 USB 포트에 연결되었는지 확인합니다.

연결 확인하기:
- 전원 코드를 연결하고 코드가 스캐너 후면의 전원 커넥터에 제대로 연결되었는지 확인합니다.
- 전원 코드 플러그를 콘센트에 연결합니다.
참고: 벽면 스위치 또는 전원 스트립을 사용하는 경우 전원이 켜져 있는지 확인합니다.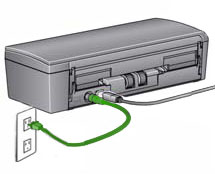
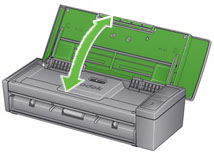
- 위쪽 덮개를 엽니다.
">" 버튼의 LED가 녹색으로 깜박입니까?
해당하지 않는 경우
전원 콘센트가 올바르게 작동하는지 확인합니다.
- 스캐너 전원 코드를 콘센트에서 분리합니다.
- 전원 콘센트에 다른 장치를 연결합니다.
Maintaining
-
이미지 품질: 이미지 품질을 향상시키려면 어떻게 해야 합니까?
아래 문서에 표시된 절차를 따라 스캐너를 청소합니다.
주의:- 에어, 액체 또는 가스 스프레이 세정제 또는 기타 가정용 세제를 사용하지 마십시오.
- 뜨거운 표면에 클리너를 사용하지 마십시오.
- 표면이 주변 온도 정도로 식은 후에 사용하십시오.
- 환기를 충분히 시키십시오. 밀폐된 곳에서 클리너를 사용하지 마십시오.
- 내부 구성품을 청소하기 전에 스캐너의 전원 코드를 먼저 해제합니다.
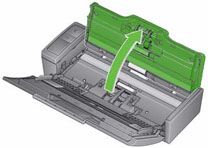
- 위쪽 덮개를 엽니다.
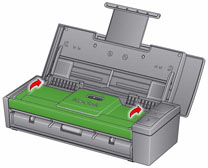
- 스캐너 커버를 엽니다.
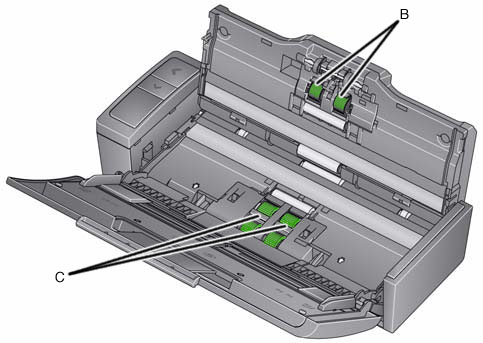
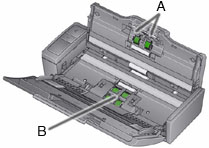
- 롤러 청소용 패드를 사용하여 급지 롤러 - A를 닦습니다. 롤러를 회전하여 전체 표면을 청소합니다.
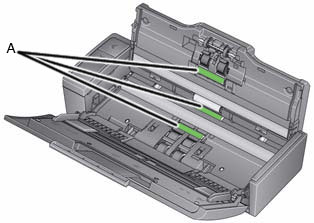
- 롤러 청소용 패드를 사용하여 분류 롤러 - B를 닦습니다. 롤러를 회전하여 전체 표면을 청소합니다.
- 롤러 청소용 패드를 사용하여 급지 모듈 - C를 좌우로 닦습니다. 롤러를 회전하여 전체 표면을 청소합니다.
참고: 스캐너 청소에 관한 더 자세한 정보는 제품과 함께 제공된 사용자 안내서를 참조하십시오. - 전원 코드를 스캐너에 연결합니다.
- 스캐너의 덮개를 닫습니다.
- 문서를 스캔합니다.
- How do I obtain consumables?
-
SCANMATE i940 스캐너의 급지 모듈을 교체하고 싶습니다.
급지 모듈 분리:
- 위쪽 덮개를 엽니다.
- 스캐너 커버를 엽니다.
- 스캐너의 전원을 연결 해제합니다.
- 급지 모듈 덮개 분리:
- 급지 모듈 덮개 양쪽의 탭을 누릅니다.
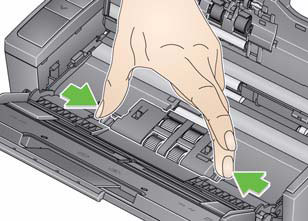
- 급지 모듈 덮개를 들어 올려 분리합니다.
- 급지 모듈 덮개 양쪽의 탭을 누릅니다.
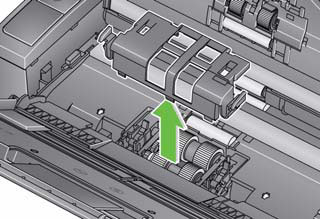
- 급지 모듈 분리:
- 급지 모듈을 위에서 아래로 눌러 회전시킵니다.

- 한쪽 면을 들어 올린 후 급지 모듈을 제거합니다.
- 급지 모듈을 위에서 아래로 눌러 회전시킵니다.
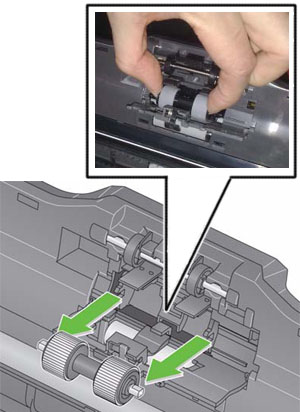
급지 모듈 설치:
- 급지 모듈 축을 프레임의 슬롯으로 삽입합니다.
- 다른 쪽을 삽입한 후 급지 모듈을 눌러 고정시킵니다.
- 급지 모듈 덮개를 프레임의 열린 부분과 정렬시킵니다.
- 급지 모듈 덮개를 눌러 고정시킵니다.
- 스캐너의 덮개를 닫습니다.
- 스캐너에 전원을 공급합니다.
-
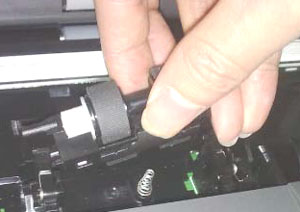
SCANMATE i940 스캐너의 분리 롤러를 교체하고 싶습니다.
분리 롤러 해제:
- 스캐너의 전원을 연결 해제합니다.
- 위쪽 덮개를 엽니다.
- 스캐너 커버를 엽니다.
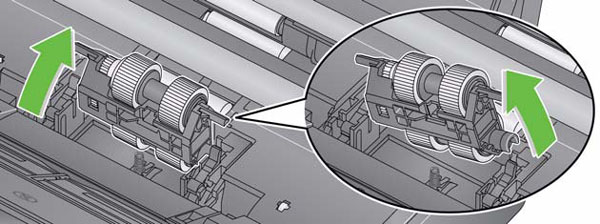
- 손톱 끝으로 분리 롤러 덮개를 엽니다.

- 분리 롤러를 분리합니다.
- 바깥쪽 가장자리의 분리 롤러를 잡습니다.
- 분리 롤러를 잡아당겨 분리합니다.
분리 롤러 설치:
- 프레임의 슬롯에 맞추어 축의 평평한 면으로 분리 롤러를 삽입합니다.
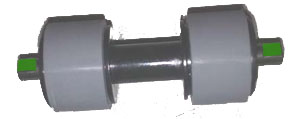
- 분리 롤러를 눌러 고정시킵니다.
- 분리 롤러 덮개를 닫습니다.
- 스캐너의 덮개를 닫습니다.
- 스캐너에 전원을 공급합니다.
-
How do I resolve an error code E4 (Scanner error)?
Restart the scanner:
- Close the top cover.
- Open the top cover.
- Restart the scanning application and resume scanning.
-
How do I resolve an error code U6 (Scanner cover open error)?
Close the scanner cover.
-
How do I resolve an error code U8 ( Multifeed error)?
- Open the scanner cover.
- Remove the multifed documents.
- Change the driver window to the type of paper you are using.
- Check that the following are clean and not worn:
- Separation rollers - A
- Feed rollers - B
- Close the scanner cover.
IMPORTANT: Verify that the documents you are scanning meet the following specifications:- Acceptable Paper Weight: 4.9 to 14.5 g/m2 (10.7 to 32 lbs.)
- Maximum document size: 21.6 x 165.1 cm (8.5 x 65 in.)
- Minimum document size: 8.0 x 5.2 cm (3.15 x 2.05 in.)
- Maximum number of documents in the input tray is 20
- Align and load the documents again. Do not load more then 20 documents in the input tray.
- Move the guides until they just touch the edge of the document.
- Restart the scanning application and resume scanning.
- Open the scanner cover.
-
How do I resolve an error code U9 (Paper jam or unexpected error)?
IMPORTANT: The U9 error occurs when there is a paper jam in the scanner. This error can also occur when something unexpected happens like the loss of power during scanning. With some older computer operating systems when you use the scanner without the power supply, a power starvation situation can occur.
Did a blank sheet exit the scanner while you were scanning?
----------------------------------------------------IF YES--------------------------------------------------
- Open the scanner cover.
- Remove the documents that are being scanned.
- Close the scanner cover.
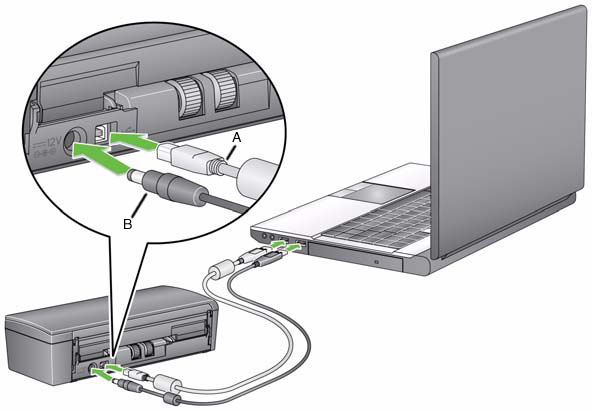
- Check the USB connections between the scanner and your computer. If you are
only using one USB cable (B), connect the other USB cable (A) between your
scanner and computer.
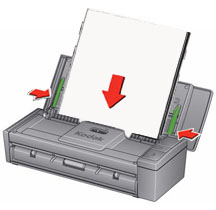
- Align the documents and load them into the input again.
- Move the guides until they just touch the edge of the document.
- Restart the scanning application and try to scan again.
----------------------------------------------------IF NO ---------------------------------------------------
- Open the scanner cover.
- Remove the documents that are being scanned.
- Clear the paper jam:
- Inspect the inside of the scanner for bits of paper or other foreign objects.
- If necessary, clean:
- Separation rollers - A
- Feed module - B
- Inspect the inside of the scanner and clean it if necessary.
- Close the scanner cover.
IMPORTANT: Verify that the documents you are scanning meet the following specifications:- Acceptable Paper Weight: 4.9 to 14.5 g/m2 (10.7 to 32 lbs.)
- Maximum document size: 21.6 x 165.1 cm (8.5 x 65 in.)
- Minimum document size: 8.0 x 5.2 cm (3.15 x 2.05 in.)
- Align the documents and load them into the input again.
- Move the guides until they just touch the edge of the document.
- Restart the scanning application and resume scanning.
- 드라이버를 업데이트하고 싶습니다.
-
Kodak Alaris 스캐너에 사용할 수 있는 공급품과 소모품에는 무엇이 있습니까?
- 모든 Kodak Alaris 스캐너에 사용할 수 있는 공급품과 소모품의 전체 목록은 제공품 및 소모품 가이드를 참조하십시오.
-
What do I do if my scans have clipped corners?
IMPORTANT: If a sheet is not fed evenly from the input tray, the scan may skew and the corners of the image may get clipped off during the scanning process.
Do the following for best results when loading documents into the scanner:
- Verify that all inks and correction fluids are dry.
- Remove any staples or paper clips.
- Align the leading edges of the sheets.
- Load the sheets so they are centered in the input tray with the side to be scanned facing away from you.
- Move the side guides until they just touch the edges of the sheets.
- Scan your document(s).
-
오류: Framework 오류가 발생한 경우 어떤 조치가 필요합니까? ".NET Framework 버전 2.0 이상이 감지되지 않았습니다. 동기화 기능 일부가 정상적으로 작동하지 않을 수 있습니다."
문제
PRESTO! BIZCARD 소프트웨어를 WINDOWS 8을 실행 중인 시스템에 설치한 후 설치 도중 또는 설치 후 소프트웨어를 처음 실행 시 다음 메시지가 표시됩니다.
".NET Framework 버전 2.0 이상이 감지되지 않았습니다. 동기화 기능 일부가 정상적으로 작동하지 않을 수 있습니다."
해상도
- 제어판 > 프로그램 및 기능을 선택합니다
- WINDOWS 기능: .NET Framework 3.5를 켭니다.
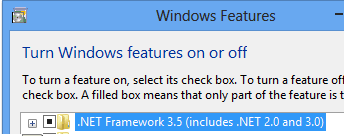
- PRESTO! BIZCARD 소프트웨어를 다시 설치합니다.
- 제어판 > 프로그램 및 기능을 선택합니다