SCANMATE i940スキャナー FAQs
Below are the frequently asked questions for the SCANMATE i940スキャナー.
Select another product by typing the name in the field below.
Installing
-
スキャナーのインストール方法を教えてください。
スキャナーのインストール方法に関する詳細は、「ユーザーズガイド」のセクション 2 を参照してください。
Using
-
スマートタッチの使用方法を教えてください。
このソフトウェアの使用方法については、SmartTouchのユーザーガイドを参照してください。
-
How can I obtain professional services and support for the scanner?
For information on how to contact Alaris support, please visit Alaris Services and Support.
-
SVT/ドライバ</span>のバージョンの確認方法を教えてください。
- [コントロールパネル] > [プログラムの追加と削除](XP)、または[プログラムと機能](Vista & 7)の順に開きます。
- コダック[スキャナーモデル]スキャナーまでスクロールダウンします。
- Vista および 7 ― バージョンは右端の列にあります。 バージョンをメモします。
- XP ― 「サポート情報についてはここをクリック」リンクをクリックします。 バージョンをメモします。

-
テストスキャンの方法を教えてください
- 利用可能なオプションについては、「ユーザーズガイド」のセクション 3 を参照してください。
Troubleshooting
-
What do I do if my scanner is running slowly?
- Your host PC may not meet the minimum requirements for the scanner. See Appendix A, Specifications, in the User’s Guide.
- Some image processing functions can reduce scanner speed.
- Your resolution (dpi) for image output may be too high.
- Your compression setting may be too low.
- Your anti-virus software may be scanning all TIFF or JPEG files.
- Check that you are scanning to a local drive.
-
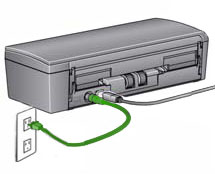
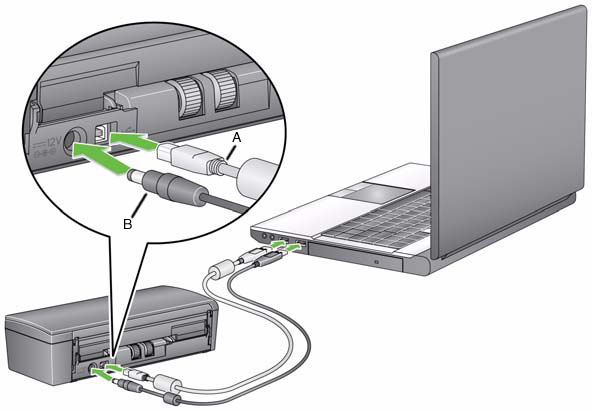
接続インターフェース: コンピュータがスキャナーを認識しない場合はどうしたらいいですか?
USBケーブルがコンピュータおよびSCANMATE i940 スキャナーのUSBポートに装着されていることを確認してください。

接続の確認:
- 電源コードを接続し、スキャナー背面の電源コネクタに完全に装着されていることを確認してください。
- 電源プラグをコンセントに接続します。
注: 壁のコンセントまたは電源コードが使用されている場合は、電源が入っていることを確認してください。
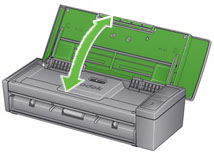
- 上部カバーを開けます。
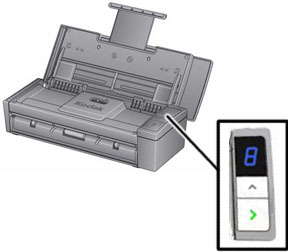
緑色の [ > ] ボタンが引き続き点灯していますか?
いいえの場合
電源コンセントが正常に機能していることを確認します。
- スキャナーの電源コードを電源コンセントから抜きます。
- 別のデバイスを電源コンセントに差し込みます。
Maintaining
-
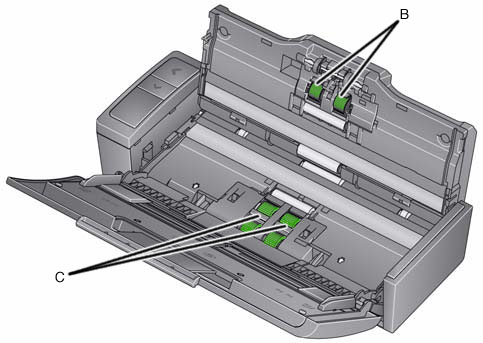
画質: どうやって画質を改善できますか?
以下に記載の手順に従ってスキャナーのクリーニングを行います。
注意:- エアー、液体または気体のスプレークリーナ、またはその他の家庭用洗剤は使用しないでください。
- 表面が熱くなっている場合はクリーナを使用しないでください。
- 表面の温度が常温に下がってからクリーナを使用してください。
- 換気を十分に行ってください。 密閉された場所でクリーナを使用しないでください。
- 内部の部品のクリーニングを行う前に、スキャナーから電源コードを外します。
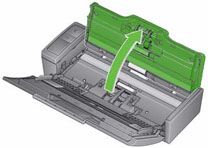
- 上部カバーを開けます。
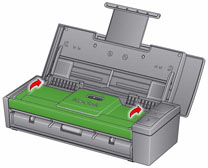
- スキャナーカバーを開けます。
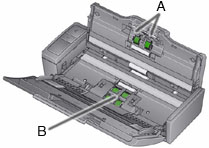
- 3つのフィードローラ - Aをローラクリーニングパッドで左右に拭きます。 ローラを回転させながら拭き、表面全体をクリーニングします。
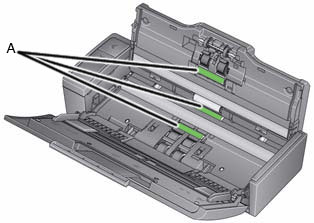
- セパレーションローラ - Bをローラクリーニングパッドで左右に拭きます。 ローラを回転させながら拭き、表面全体をクリーニングします。
- フィードモジュールタイヤ - C をローラクリーニングパッドで左右に拭きます。 ローラを回転させながら拭き、表面全体をクリーニングします。
注: スキャナーのクリーニングに関する詳細は、製品に付属の「ユーザーガイド」を参照してください。 - 電源コードをスキャナーに接続します。
- スキャナーカバーを閉じます。
- 書類をスキャンします。
- 消耗品の入手方法を教えてください。
-
SCANMATE i940スキャナーのフィードモジュールの交換方法を教えてください。
フィードモジュールの取り外し:
- 上部カバーを開けます。
- スキャナーカバーを開けます。
- スキャナーから電源を外します。
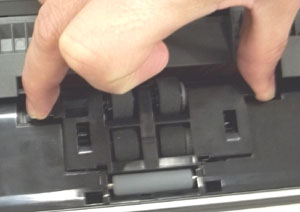
- フィードモジュールカバーの取り外し:
- フィードモジュールカバーの両端のタブを強く押します。
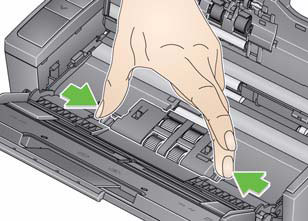
- フィードモジュールカバーを持ち上げて取り外します。
- フィードモジュールカバーの両端のタブを強く押します。
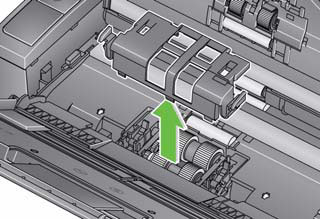
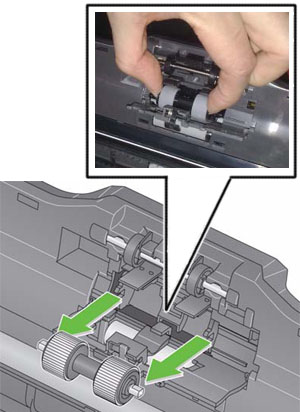
- フィードモジュールの取り外し:
- フィードモジュールを下から押し上げて回します。

- 片側を持ち上げて、フィードモジュールを取り外します。
- フィードモジュールを下から押し上げて回します。
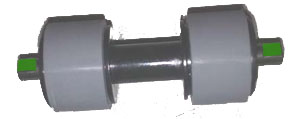
フィードモジュールの取り付け:
- フィードモジュールシャフトの片側をフレームのスロットに差し込みます。
- もう一方の端を差し込み、フィードモジュールを押し込んで装着します。
- フィードモジュールカバーをフレームの開口部に揃えます。
- フィードモジュールカバーを押し込んで装着します。
- スキャナーカバーを閉じます。
- 電源をスキャナーに接続します。
-
SCANMATE i940スキャナーのセパレーションローラの交換方法を教えてください。
セパレーションローラの取り外し:
- スキャナーから電源を外します。
- 上部カバーを開けます。
- スキャナーカバーを開けます。
- 爪でセパレーションローラカバーをこじ開けます。

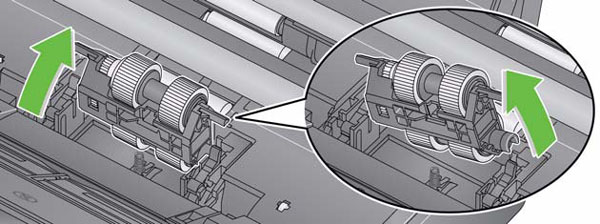
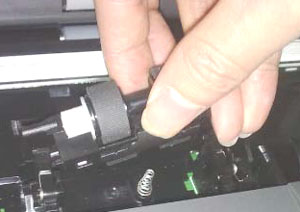
- セパレーションローラの取り外し:
- 親指と人差し指でセパレ―ションローラの外縁を持ちます。
- セパレーションローラを引き出します。
セパレーションローラの取り付け:
- セパレーションローラをフレームのスロットに揃えたシャフトの平らな面に挿入します。
- セパレーションローラを押し込んで装着します。
- セパレーションローラカバーを閉じます。
- スキャナーカバーを閉じます。
- 電源をスキャナーに接続します。
-
How do I resolve an error code E4 (Scanner error)?
Restart the scanner:
- Close the top cover.
- Open the top cover.
- Restart the scanning application and resume scanning.
-
How do I resolve an error code U6 (Scanner cover open error)?
Close the scanner cover.
-
How do I resolve an error code U8 ( Multifeed error)?
- Open the scanner cover.
- Remove the multifed documents.
- Change the driver window to the type of paper you are using.
- Check that the following are clean and not worn:
- Separation rollers - A
- Feed rollers - B
- Close the scanner cover.
IMPORTANT: Verify that the documents you are scanning meet the following specifications:- Acceptable Paper Weight: 4.9 to 14.5 g/m2 (10.7 to 32 lbs.)
- Maximum document size: 21.6 x 165.1 cm (8.5 x 65 in.)
- Minimum document size: 8.0 x 5.2 cm (3.15 x 2.05 in.)
- Maximum number of documents in the input tray is 20
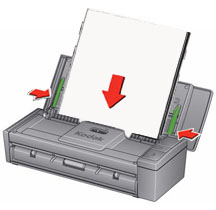
- Align and load the documents again. Do not load more then 20 documents in the input tray.
- Move the guides until they just touch the edge of the document.
- Restart the scanning application and resume scanning.
- Open the scanner cover.
-
How do I resolve an error code U9 (Paper jam or unexpected error)?
IMPORTANT: The U9 error occurs when there is a paper jam in the scanner. This error can also occur when something unexpected happens like the loss of power during scanning. With some older computer operating systems when you use the scanner without the power supply, a power starvation situation can occur.
Did a blank sheet exit the scanner while you were scanning?
----------------------------------------------------IF YES--------------------------------------------------
- Open the scanner cover.
- Remove the documents that are being scanned.
- Close the scanner cover.
- Check the USB connections between the scanner and your computer. If you are
only using one USB cable (B), connect the other USB cable (A) between your
scanner and computer.
- Align the documents and load them into the input again.
- Move the guides until they just touch the edge of the document.
- Restart the scanning application and try to scan again.
----------------------------------------------------IF NO ---------------------------------------------------
- Open the scanner cover.
- Remove the documents that are being scanned.
- Clear the paper jam:
- Inspect the inside of the scanner for bits of paper or other foreign objects.
- If necessary, clean:
- Separation rollers - A
- Feed module - B
- Inspect the inside of the scanner and clean it if necessary.
- Close the scanner cover.
IMPORTANT: Verify that the documents you are scanning meet the following specifications:- Acceptable Paper Weight: 4.9 to 14.5 g/m2 (10.7 to 32 lbs.)
- Maximum document size: 21.6 x 165.1 cm (8.5 x 65 in.)
- Minimum document size: 8.0 x 5.2 cm (3.15 x 2.05 in.)
- Align the documents and load them into the input again.
- Move the guides until they just touch the edge of the document.
- Restart the scanning application and resume scanning.
-
ドライバのアップデート方法を教えてください。
- ここにあるドライバとダウンロードのページにアクセスし、最新のドライバを確認してください。
- スキャナーのインストール方法に関する詳細は、「ユーザーズガイド」のセクション 2 を参照してください。
-
Kodak Alarisスキャナーでは、どのような供給品および消耗品を利用できますか?
- すべてのKodak Alarisスキャナーで利用できる供給品および消耗品の詳しいリストについては、『供給品および消耗品ガイド』を参照してください。
-
What do I do if my scans have clipped corners?
IMPORTANT: If a sheet is not fed evenly from the input tray, the scan may skew and the corners of the image may get clipped off during the scanning process.
Do the following for best results when loading documents into the scanner:
- Verify that all inks and correction fluids are dry.
- Remove any staples or paper clips.
- Align the leading edges of the sheets.
- Load the sheets so they are centered in the input tray with the side to be scanned facing away from you.
- Move the side guides until they just touch the edges of the sheets.
- Scan your document(s).
-
エラー: フレームワークエラーが表示された場合はどうしたらいいですか? 「.NET Framework バージョン2.0以降が検出されませんでした。 同期機能の一部が正常に機能しない可能性があります。」
問題点
PRESTO! BIZCARD ソフトエアを Windows 8 を実行しているシステムにインストールすると、インストール中、またはインストール完了後に初めてソフトウェアを起動する際に次のメッセージが表示されます。
「.NET Framework バージョン2.0 以降が検出されませんでした。 同期機能の一部が正常に機能しない可能性があります。」
解決策
- [コントロールパネル] > [プログラムと機能]の順に選択します。
- 以下の Windows の機能をオンにします。 .NET Framework 3.5
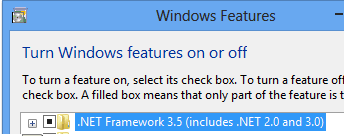
- PRESTO! BIZCARD ソフトウェアを再度インストールします。
- [コントロールパネル] > [プログラムと機能]の順に選択します。